5. Website Modification and Content Management
Once your website is created and the theme is successfully assigned, Sitegenix gives you Super Admin access to manage every aspect of your website — from content and appearance to products, pages, and even staff roles.
Step 1: Access the Super Admin Panel
Login to your User Dashboard (https://sitegenix.io/login)
Click the "Login as Superadmin" button.
You will be redirected to the Super Admin Dashboard — your control center for managing the website.
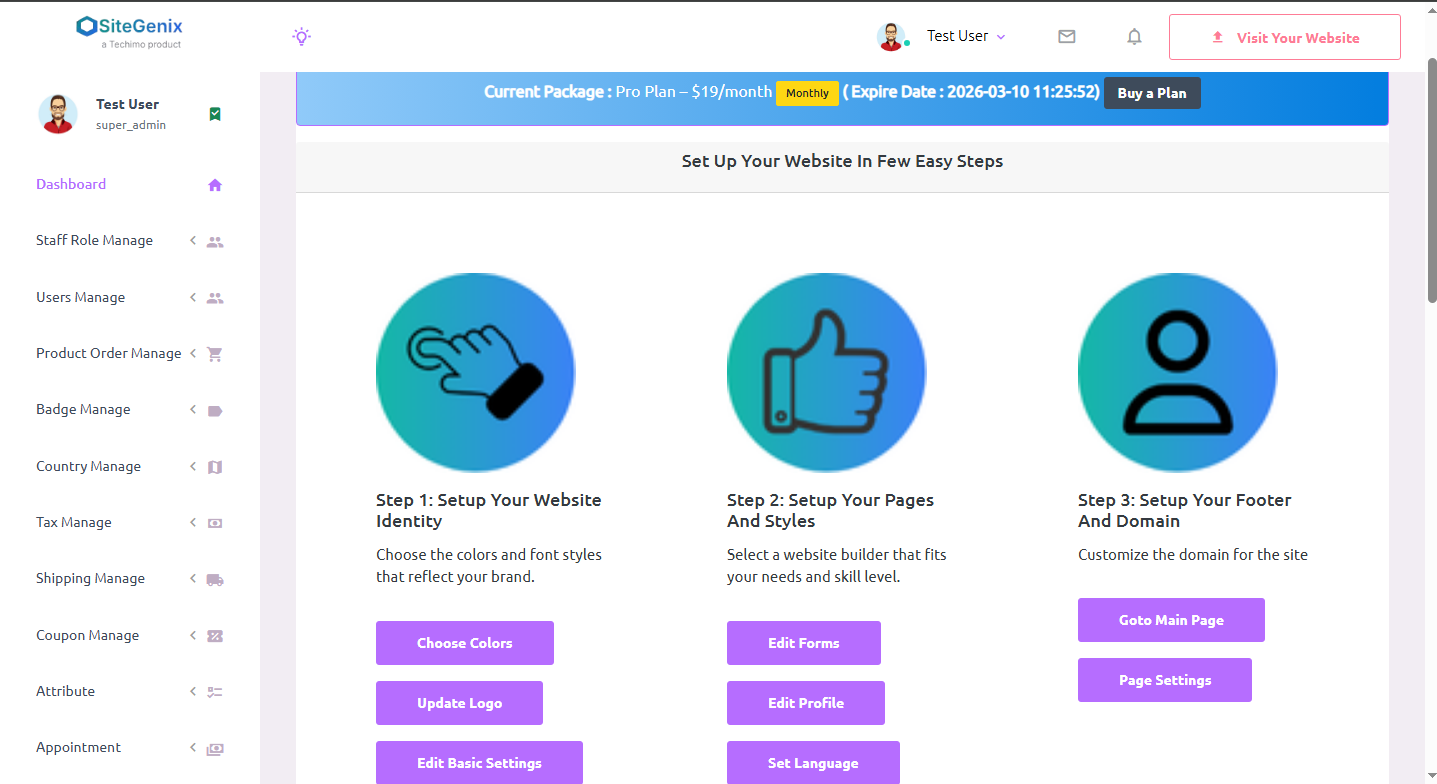
Step 2: Quick Setup Wizard
At the top of the Super Admin Dashboard, you'll see the "Set up your website in a few easy steps" area. It allows you to quickly configure:
Upload Logo
Change Color Scheme
Basic Website Info (name, favicon, timezone)
Edit Business Profile
Language Settings
Main Page Access and Page Management
Step 3: Page & Content Builder
Use Sitegenix's drag-and-drop page builder to manage your site pages:
Go to Pages in your dashboard.
Click "Edit with Page Builder" on any page.
Use prebuilt widgets (text, images, sliders, etc.) to customize content.
Save and publish instantly.
Step 4: Header & Footer Editing
Header: Dashboard → Appearance → Header Settings
Footer: Dashboard → Appearance Settings → Widget Builder → Edit footer elements
Step 5: E-commerce & Product Management
Manage your store effortlessly:
| Feature | Description |
|---|---|
| Products | Add/edit products, manage categories, inventory, and pricing. |
| Orders | Track customer orders and fulfillment. |
| Badges | Create labels like "New", "Hot", or "Sale - 50% Off". |
| Coupons | Create discount codes and offers. |
| Shipping/Tax | Set country-wise tax, shipping methods, and regions. |
Step 6: Team and Role Management
Access Staff & Roles
Add admin and support members
Assign roles like Admin, Editor, or Custom Role
Step 7: Extra Business Features
Sitegenix gives powerful tools to extend your business functionality:
| Tool | Description |
|---|---|
| Testimonials | Add customer reviews/testimonials to build trust. |
| Brands | Display affiliated or supported brand logos. |
| Services | List your services and categorize them. |
| Portfolio | Showcase previous work, case studies, and projects. |
| Appointments | Allow users to book time slots via an appointment system. |
| Knowledgebase | Create helpful articles for users. Categorize by topic. |
| Blog System | Post news, tips, and updates with full blogging functionality. |
| Newsletter | Collect emails and send updates via integrated newsletter manager. |
| Support Ticket System | Let users raise issues or queries and manage them through tickets. |
| Image Gallery | Display collections or galleries of images in beautiful layouts. |
Step 8: Appearance and General Settings
Website Palette & Colors
Menu Management
Theme Settings
Topbar and Layout Settings
SEO for each page (meta title, description, slug)
Third-party integrations (like analytics, chat, etc.)
Step 9: Payment Gateway Settings
Go to Dashboard → Payment Settings
Choose gateways like PayPal, Stripe, Razorpay, etc.
Activate, configure credentials, and test them
🔧 Summary
With Super Admin access on Sitegenix, you are fully in control of your business website:
- Modify content and layout using drag-and-drop builder
- Configure products, orders, badges, coupons, and store settings
- Add blogs, testimonials, and portfolios
- Manage team roles and services
- Enable bookings, newsletters, support system, and knowledgebase
- Customize header, footer, SEO, themes, and languages
- Connect and manage payment gateways
Everything is designed to be user-friendly, no coding required — all manageable from a single powerful dashboard.